Stendhal on Eclipse: Difference between revisions
imported>Hendrik Brummermann |
imported>Hendrik Brummermann |
(No difference)
| |
Revision as of 23:03, 21 June 2015
- |
This guide describes how to setup a development environment in Eclipse for Stendhal.
Get Eclipse
- Go to https://www.eclipse.org/downloads/
- Download: "Eclipse IDE for Java Developers"
- Unzip the download an run Eclipse
- In Eclipse, close the "Welcome" window
You can click on the following images to see them in large.
-
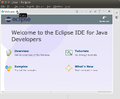 On the first run of Eclipse, this "Welcome" window is shown. Please close it.
 -
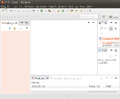 Typical window layout with the Package Explorer on the left hand side and an empty area for editors in the middle


New Project from Git
In Eclipse:
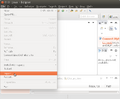
- Open menu "File -> Import
- In the dialog select: "Git -> Projects from Git" and click "Next".
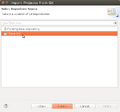
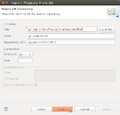
- Select "Clone URI" and click "Next".
- Fill in the following information:
URI:git://git.code.sf.net/p/arianne/stendhal - The result of the fields are filled in automatically, click "Next"
- On the Branch selection page, keep everything selected and click "Next"
- Under "Destination" choose the directory where you want to download the source code and select "Next".
- Eclipse will now download Stendhal from git, this may take a while
- "Import existing projects" and select "Next"
Click on the screenshots to enlarge them, if you need help with any of the steps:
-
 Import
 -
 Import from Git
 -
 Clone URI
 -
 Fill in URI and watch the remaining fields to be filled automatically
 -
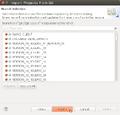 Just click "next" on branch selection
 -
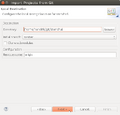 Just click "next" on destionation
 -
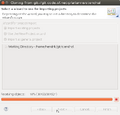 Wait for the download to complete. This may take quite a while


Configure Project
- Check the text encoding at Project -> Properties -> Resource -> Text Encoding. Set it to UTF-8 unless it is that already.
Eclipse should be able to compile the source code now. There could be a little yellow sign (signalling warning messages) before your project folder but there must not be red X (error messages). The package explorer should now display the "src" and "test" folder below the root folder with a different icon, the icon is like a small grid.
Trouble Shooting
menu Windows | Preferences | Java | Installed JREs
- there should be at least one entry with a valid JAVA_HOME path (make it so so JDK compliance is at least Java 7)
To make it run the server in Debug mode
- In the toolbar there is the "Debug" button, which looks like a little, green bug. There is a little black arrow on the right side of it.

- This will open a menu, please choose "Debug configurations ..." ("Open Debug Dialog..." on older versions)
- Then in the dialog select "Java Application" and click on the "new" icon in the top left corner.

 Name: StendhalServer
 Main class: games.stendhal.server.StendhalServer

* All other settings ("include system libries", "Stop in main", ... can be left at their default value.

on the [Arguments] tab:
VM arguments: -Xmx128M

on the [Classpath] tab:
 click UserEntries
 button "Advanced"
(*) add folder | OK
 and select the project root folder | OK
- button [Debug]
And then the server should be started.
To make the client run
- Open games.stendhal.client.update.Starter.java in the editor
- Then again the small black arrow on the right side of the green bug. (Or you may also choose to use the "Run" command instead of "Debug" in case you only want to debug the server component.)
- Select "Debug Configurations" (or "Run Configurations...").
- Select Java Application and click the "New" button in upper-left corner.
- On the [Classpath] tab select "User Entries" - button "Advanced" - (*) add folder | OK - and select the project root folder. | OK
yay shiny new client, shiny server
Making patches
If you have modified and tested the code and want to send us a patch, please see How To Create Patch For Stendhal.
Running JUnit Tests in Eclipse
Setting up JUnit tests in Eclipse:
- Click the arrow next to either the green "Run" or "Debug" button.
- Select "Run/Debug Configurations...".
- Select "JUnit" in the left column and press the "New launch configuration" at the top of left column.
- Give it a unique name, like "Stendhal Tests".
- Select "Run all tests in the selected project, package or source folder".
- OPTIONAL: (this step simply reduces the number of directories that Eclipse will search in for tests)
- Press "Search".
- Select "tests" folder under Stendhal root directory and press "OK".
- Under "Test runner" select "JUnit 4".
- Under "Classpath" tab select "User Entries" and press "Advanced" on the right panel.
- NOTE: There should already be a folder under "User Entries" with a "(default classpath)" suffix. Do not delete this folder.
- Select "Add Folders" and press "OK".
- Select the Stendhal root folder and press "OK".
- Now click "Add JARs..." on the right panel.
- Under the Stendhal root folder select all the .jar files in libs and press OK.
- Now press "Apply" to save the configuration or "Run" to save and run it.